
You all know the name of my blog is called Chinos & Cheesecake. And that I think there is nothing like a well-made, well-fitting pair of chinos.
Well, here's the other half. The cheesecake. The love affair started maybe around 15 years ago or so. I was in Ryan's with my parents on a Sunday afternoon like we normally did back then. I quickly destroyed two helpings of macaroni, wings, shrimp, and corn (I always got the same thing every time...always). When I made my way to the dessert bar, I noticed there was something new. They had cheesecake. I had never had it before. It was something that I had seen on cooking shows, but always wanted to try. After all, my favorite food at the time was cheese. So I automatically assumed that cheesecake must taste awesome. So I made my way back to my seat and took the first bite of cheesecake ever in my life. And. I. Literally. Wet. Myself. It was amazing. I thought to myself, "Where have you been all my life?"
So after that, just about any time I had the opportunity, I got some. However, it wasn't until recently that I actually taught myself to cook it. One of the things I love most is that there are so many ways to do it... Different things you can add to get a completely different flavor. Cheesecake is hands-down my favorite food. And in honor of National Cheesecake Day, I'd like to share with you how I make it.
The Ingredients.
|
|
|
3/4 cup sugar, 1 1/2 cups heavy whipping cream, 2 Tbsp. peanut butter, 10 strawberries, 3/4 tsp. vanilla extract, 1/4 cup all purpose flour, 3 8 oz. packages cream cheese, 2 deep pie shells, 3 eggs, 2 8 oz. cool whip |
Step 1.
Preheat oven to 300 degrees F.
Step 2.
Take your 3 cream cheeses and pop them in the microwave for about 20 seconds or so, just to get them soft. Then scrape them into a large bowl.

Step 3.
Add 3/4 cup of sugar and 1/4 cup of all-purpose flour. Then get your mixer and go to town until it's thoroughly mixed.

Step 4.
Add 3 eggs, one at at time. Mix well between each one.

Step 5.
Scrape the sides. Add 3/4 tsp. of vanilla extract and 1 1/2 cups of heavy whipping cream and mix well.

Step 6.
Separate equally into 2 bowls..

Step 7.
If you want to add some thing special to it like strawberries, blueberries, bananas, chocolate, etc., now is the time to do it. For this one I will keep one plain and I will add peanut butter to the other. Now, this isn't just regular Jiffy peanut butter. Its all-natural, made locally in Summerville by Stella's Gourmet. Its the best $7 you'll ever spend. Seriously.


Step 8.
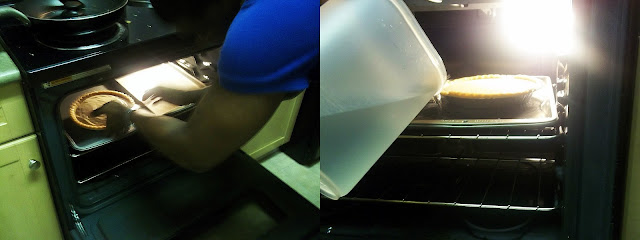
Place them in the oven on a rimmed baking pan and pour water about halfway up the pan to make sure they cook evenly and they don't dry out.
Step 9.
Set the timer on the oven for 45 minutes. You will know its done when the center is a little jiggly. Take it out and let it cool at room temperature for about an hour. It will look a little puffy at first but that's normal. Then put it in the fridge for another 4 hours.

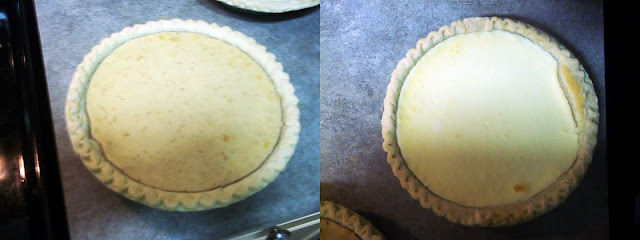
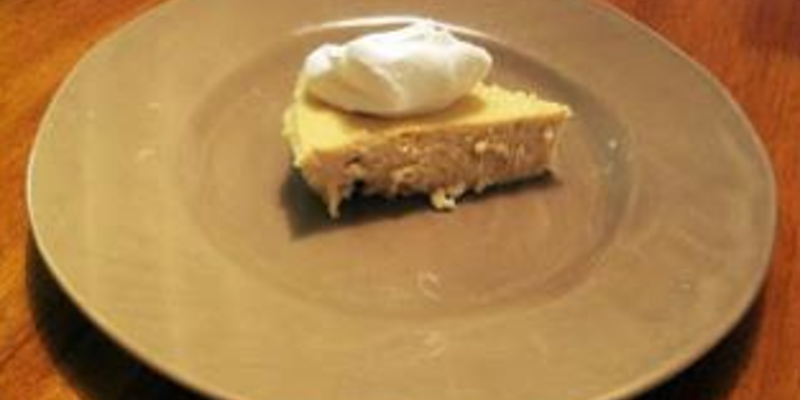
This is how they will look after being in the fridge. Notice how they're no longer puffy and have more of a flat surface. That's peanut butter on the left and plain on the right. Occasionally there will be cracks, but that's just the nature of the beast.
Step 10.
Final thing to do is to slice, top, and enjoy! In case you're wondering, I made a quick little strawberries and cream topping for the plain one. It's 8 oz. of cool whip, about 10 strawberries cut into cubes, and 1 cup of powdered sugar.


Copyright © 2015 Dez Inc. dba GulfStream Communications