
I love kale. It's ornamental in the garden and crazy delicious in the kitchen! This year I grew five different varieties and now is the time to harvest. Here are a few basics for growing your own, plus a delicious recipe for kale chips (highly recommend...).
Common name: Kale
Latin name: Brassica oleracea; Acephala
Growing: Fall is the time to sow seeds in the Southeast, when soil temperatures begin to cool. It takes the cooler temperatures to set a sweeter flavor. Kale prefers a soil with a pH of 6.5 to 6.8 (soil tests are available through Clemson Extension) and rich in organics, and requires consistent water (approximately 1 to 1.5 inches per week). Be sure to plant in full sun for strong plants. When harvesting, tender young leaves can be added to a salad. Harvest outer leaves first as new growth will radiate from the center of the plant.
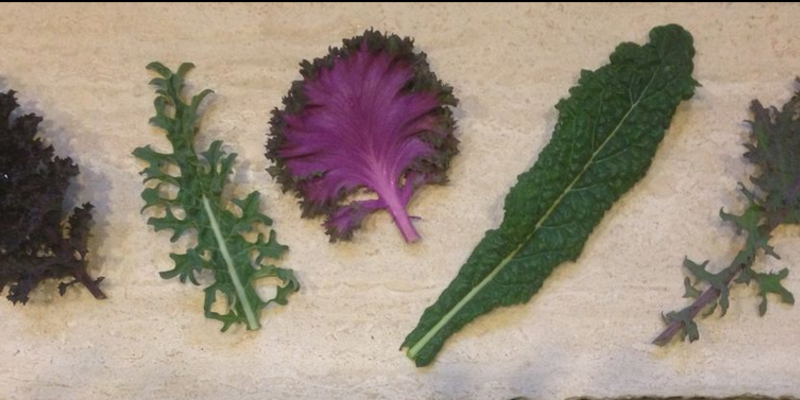
Varieties: This is the biggest challenge... choosing what kind to grow. Take a look.

(Left to right) Redbor, White Russian, Red Chidori, Nero di Toscana, Red Winter
Redbor Kale: Great in containers, deep purple in color with ruffled edges. Excellent mild flavor. Does great in the garden every year!
White Russian: This taller kale has grown beautifully this year. It has an excellent flavor and a beautiful green-frilled leaf.
Red Chidori: Beautifully compact, brilliant in color! The cooler temperatures will bring out this kale beauty’s true colors. It's hard to say which is better—its good looks or good taste. Plant in your garden or favorite container.
Nero Di Toscana: This is also known as the black palm. The shape of the leaf is long and dark green in color, with an unusual crumbled texture. Much like a palm? It has been popular on tables in Tuscany and central Italy for many years, and is served in many local restaurants, too!
Red Winter: Red Winter Kale has gorgeous purple leaves that are highlighted with pinkish-purple veining. It is a larger kale and, flavor-wise, well worth planting.
Recipe: Front Yard to Table's Kale Chips (aka, the world’s greatest potato chip substitute!)

1. Preheat oven to 425 F. Collect a variety of different types of kale. The colors and leaf shapes make the presentation more interesting.

2. Wash and remove the leaf rib using a knife.(photo)
3. Dry leaves, toss in a bowl and spray with an olive oil in an atomizer. The use of an atomizer will lightly cover the leaves with oil and not weigh them down.

4. Select your favorite dried herb combination. If you want to just go with a light salt I like to use a microplane and grate directly from the salt rock. The result is a light fluffy salt that adheres well to the oil without weighing the leaf down. Toss dried herbs or salt to coat the leaf. If you want to try out some regional custom herb blends check out the creative combinations at our local Tea and Spice Exchange! The combinations are amazing and endless! (photo)
5. Spread leaves on baking sheet, do not over lap. You can also line your oven shelf with tin foil for greater surface area. Bake leaves until crispy. You will want to flip them over to cook on both sides. It will take about 20-25 minutes per batch. You will want to make a large quantity because they are so good!

6. Place on a favorite serving piece or use a cool paper bag to make individual servings and Enjoy!

Copyright © 2015 Dez Inc. dba GulfStream Communications